PowerPoint 2007
Working with Tables

Introduction
 The goal of most PowerPoint presentations is to
communicate information
to a person or group of people. The information can be communicated in various ways, such as through pictures, lists, or paragraphs of text. Another way is to use a
table
to organize the information. A
table
is a grid of cells arranged in
rows
and
columns
.
In this lesson, you will learn how to insert a table, apply a table style, and format the table using various commands.
Working with tables
Download the example to work along with the video.
To insert a table using a placeholder command:
- Select the slide where you want to insert a table.
- Click the Insert Table command in the placeholder. The Insert Table dialog box will appear.

- Enter the number of table columns and rows in the dialog box.

- Click OK. The table will appear on the slide, and the Design and Layout tabs will appear on the Ribbon.
- Enter text into the table.
You can move your insertion point from cell to cell in the table using the mouse or by pressing the Tab key on your keyboard. Additionally, the arrow keys can be used to navigate the table.
About table styles and options
When you insert a table, PowerPoint automatically applies a table style to the table. You can see the style options in the Table Styles group on the Design tab. PowerPoint applies a style based on the theme of your presentation. In the example, PowerPoint applied a teal-colored table style to blend with the colors of the Concourse theme.

Options on the Design tab
Some of the most commonly used options include:
- Header Row : Select this option to format the first row of the table differently from other rows.
- Banded Rows : Select this option to format the table with banded rows (i.e., every other row will alternate colors).

- WordArt options : Use these commands to apply WordArt to text in the table.
- Border options : Use these commands to perform common tasks, including changing the border line width and color.

To apply a table style:
- Select the table.
- Select the Design tab to access all Table Styles and Options .
- Move your cursor over a table style in the Table Styles group to see a live preview of the style on the slide.

- Click the More drop-down arrow to see all available options.

- Click a style to select it.
Formatting a table style
To change table shading:
- Select the table.
- Select the Design tab.
- Select the rows or columns you want to modify.
- Click the Shading command in the Table Styles group.

- Move your cursor over a color option to see a live preview of the color on the slide.
- Click a color to select it.
OR select:
- No Fill : This option will leave the selected item without a fill color.
- More Fill Colors : This opens a dialog box of color choices you can use as a shading color.
- Picture : This opens the Insert Picture dialog box. From here, you can select a picture from your computer to use as the shading.
- Gradient : This displays a submenu of various gradient options that can change how the shaded color appears.
- Textures : This displays a submenu of various textures you can apply to the selected item.
To apply a border:
- Select the table.
- Select the Design tab.
- Select the rows or columns you want to modify. In this example, we want to add a line beneath the first row, so we'll select the first row.
- Click the Borders command in the Table Styles group.
- Select a borders option from the menu. In this example, we'll select Bottom Border to apply a border to the bottom of the first row.

To apply a table effect:
- Select the table.
- Select the Design tab.
- Select the rows or columns you want to modify.
- Click the Effects command. A menu will appear.
- Select a menu option. The options are: Cell Bevel , Shadow , and Reflection . This will display a submenu.
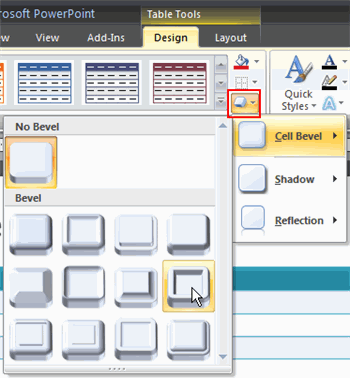
- Select an effect option from the submenu.
Working with rows and columns
To insert a row:
- Select the table.
- Select the Layout tab.
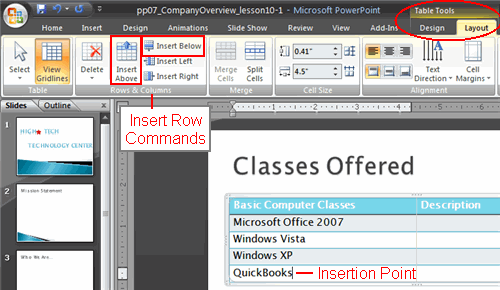
- Place the insertion point in a row adjacent to where you want the new row to appear.
- Click the Insert Below or Insert Above command.
To delete a row:
- Select the table.
- Select the Layout tab.
- Place the insertion point in the row you want to delete.
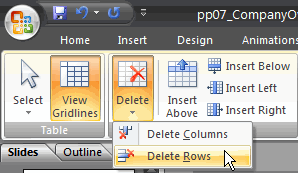
- Click the Delete command.
- Select Delete Row from the menu.
To insert a column:
- Select the table.
- Select the Layout tab.
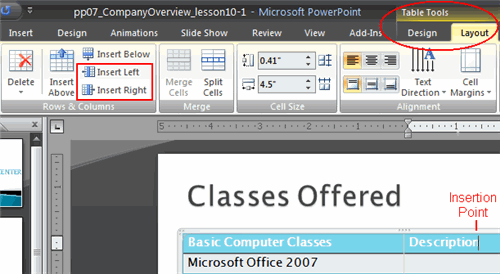
- Place the insertion point in a column adjacent to the location where you want the new column to appear.
- Click the Insert Right or Insert Left command.
To delete a column:
- Select the table.
- Select the Layout tab.
- Place the insertion point in the column you want to delete.
- Click the Delete command.
- Select Delete Column from the menu.

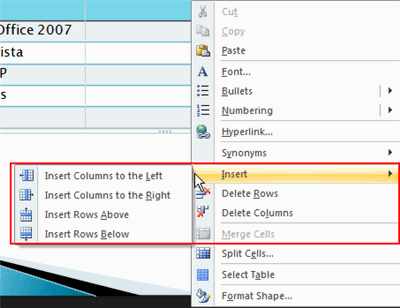
To use another method to insert and delete rows and columns:
- Place the insertion point in the row or column you want to delete.
- Right-click the table, and a menu appears.
- Select one of the Insert/Delete menu options.
Additional table formatting
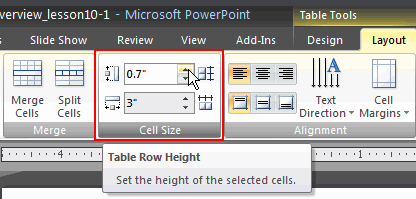
To change the cell size:
- Select the table.
- Select the Layout tab.
- Place the insertion point in the row or column you want to modify.
- Locate the Cell Size group.
- Use the arrows on the Table Row Height and Table Column Height fields to change the cell size.
To change the text alignment in a table:
- Select the table.
- Select the Layout tab.
- Select the cells you want to modify.
- Click an alignment command to change the text alignment in the table. The alignment commands are:
- Align Text Left : Aligns text to the left of the cell
- Center : Aligns text horizontally in the center of the cell
- Align Text Right : Aligns text to the right of the cell
- Align Top : Aligns text to the top of the cell
- Center Vertically : Vertically centers text in the cell
- Align Bottom : Aligns text to the bottom of the cell

To use another method to insert a table:
In addition to inserting a table using the Insert Table command in some layouts, you can insert a table using Ribbon commands.
To insert a table using Ribbon commands:
- Select the slide where you want to insert the table.
- Select the Insert tab on the Ribbon.
- Click the Table command. A menu will appear.
- Drag your mouse over the diagram squares to select the number of columns and rows in the table.
- Click to insert the table on the slide.
- Enter text into the table.

To move a table:
- Place the cursor over the edge of the table. The cursor will become a crosshair with four arrows.

- Click and drag the table to the desired location.
- Release the mouse button to drop the table in the new location.
Sizing handles are located around the table. Click, drag, and release the resizing handles to resize the table. The resizing handles work the same as with pictures, text boxes, and shapes.
Challenge!
Use the Company Overview presentation or any other presentation you choose to complete this challenge.
- Open a presentation.
- Insert a table with two columns and six rows on a slide.
- Apply a new table style .
- Format the top row as a Header Row .
- Add a Cell Bevel effect to the Header Row.
- Insert a new column.
- Delete a row.